woensdag 8 mei 2019

Star Wars Day - Legion Tournament

This is my "May the fourth be with you" Star Wars Day by the Alliance Open report. Wow that is a long name but it was also a big event. The guys from the Alliance Open put out a great Star Wars event with Xwing, Armada & Legion. The 501st Legion Dutch Garrison also made an appearance. This was Star Wars day at it's best for miniature wargamers.

In this post I will first talk about the Star Wars Legion Tournament, then about the event and other games. I made a ton of pictures and picked the best ones for you together with some pictures I snatched from the Facebook groups. Make sure to scroll all the way to the bottom.

The Star Wars Legion Tournament


this was the biggest Star Wars Legion tournament I have been to. The Legion scene in Holland is definately growing and that's so good to see. This event had 12 players on 6 tables. There could have been more but some players had to choose between x-wing and legion so next time the tournament will probably have even more players and might eventually grow to Rallypoint size. I had the honour of bringing my own two tables so I got to the venue an hour before the start to set those up. Let's have a look at the tables:

Tables
Table 1. My "Corellia" Table. An industrial zone.
(CLICK TO ENLARGE)
Table 2. My "Mos Alta" table. A Tatooine village.
(CLICK TO ENLARGE)
Table 3. Sullust industrial zone
Table 4. Space port
Table 5. Endor

Table 6. industrial zone.

 As you can see there were a lot of industrial themed tables. But next time there will also be Hoth and Mustafar tables added.

 My Army List

My Army for the day
(CLICK TO ENLARGE)
I played Rebels again but didn't want to play the same or a version of the list that I have been playing recently. I also worked hard painting up Jyn Erso and the pathfinders so I really wanted to include them in my list. When you put those in with their infiltrate and good range 2 weapons You look what other units would go well with them. I wanted to create an "up close and personal" list. So I added two AT-RT's with flamers, a unit of Fleet troopers, the mandatory Sniper unit, a Saboteur unit and 3 Rebel trooper core units. I thought this would be fun to play. The AT-RT's would draw a lot of fire because when they get close they smash units. 
The idea was to infiltrate Jyn and the pathfinders, get the AT-RT's to close in quick, let my sniper pick off enemy snipers or juicy targets, get my Saboteurs to cause panic and close down lanes, all while my rebel core troopers claim objectives and my Fleet Troopers to guard the back field. Great idea right....

When I saw the armies of the other competitors I started doubting my own list. They all had at least two sniper teams and some even three. All the Imperial players had Boba Fett. I saw a couple of lists with the new Death troopers. There was also a list with an AT-ST and one with a Occupier tank but I didn't bring much impact weapons...Well.. I made the list to have fun so I shrugged of my doubts and looked forward to my first game.

My Games 

Game 1
 My first game was versus the Imperial player Lorenzo. He had a nicely painted army with some cool conversions. That's always a bonus when you play a game. His list included Lord Vader, Imperial Guard and Boba. 
From the start it was clear the game was always going to be about who could grab the middle objective. I had more activations and a slight advantage with the terrain on the table so I felt confident.
Overview
(CLICK TO ENLARGE)
The deployment was advanced positions and I was on the right if you look at the picture. He placed his objective in the imperial Tower, One was on the refinery in the middle and I placed mine on the fuel containers on the lower right. 
He moved in with most of his units but I placed mine in cover positions near the middle objective. 


Lord Vader moving in
(CLICK TO ENLARGE)
By turn two I stated shooting at his troops that didn't have cover and quickly decimated his units. Lord Vader took a lot of hits and because I had hunter on my sniper I too kim out after some focussed fire.


Securing the win
(CLICK TO ENLARGE)
I started to secure the right and middle objective by turn three. Lorenzo only had a unit of snowtroopers and two units of storm troopers left by the end of turn three. Boba fet tried to take on three units of rebel troopers and he did manage to take two units down to 1 man but in the end it wasn't enough. 

Lorenzo conceded as there was no way he could win. It was a good game and a really nice opponent.


Game 2
My Second game was against a German player called Finn. He was very experienced and even knew my cards better than me. Sometimes things got lost in translation but overal we had a well paced game. 

Overview
(CLICK TO ENLARGE)
We again played Advanced positions but no Key positions but recover the supplies instead. I thought I had some pretty sweet terrain cover with the long wall section at the lower middle of the board. I was wrong. He simply out ranged me and focussed all his fire on three of my units. There was nothing I could do in return and I soon realised this would be a hard game.
Ambitious Krennic
(CLICK TO ENLARGE)

I almost completely lost three of my units and the rest was too far behind to counter. I decided to move in with Jyn Erso and tried to make her steal te middle objective. Unfortunately Boba Fett imobilised her and she was take out. I saw what he was doing but couldn't do anything about it. My short range weapons and spread out units were no match against this clever player.


I tried to keep him off the objective but Krennic himself moved in and snatched it. Because there was no way I could take it off him I had to concede. I was well and truly beaten. His turn 0 was a lot better than mine and his list was simply very well used against me. Playing to his strength and my weakness.


Game 3
The third Game was against my arch nemesis Hielke. He's a good guy and we get along but we've played eachother the last 3 tournaments. He brought a slightly different list with freshly painted jungle camo Snow Troopers and a unit of Death Troopers.

Overview
(CLICK TO ENLARGE)
When my opponent saw my list he went for a long war table set-up because of my range two weapons. That wasn't really a problem because The middle objective was in a favourable position for me. I infiltrated my units and kept my Saboteurs in rapid reinforcement.


Hump that rock!
(CLICK TO ENLARGE)
It was a bit of a "meet me in the middle"game were both our armies advanced up the middle covered by a huge rock blocking line of sight. Because you score ate the end of turn two in this game I out manouvered my opponent but gave up cover because of that. I scored two objectives at the end of turn two and he scored only one.


Massed fire
(CLICK TO ENLARGE)
I had to pay for that at turn three. my units were a bit out of cover and his units encircled mine. My AT-Rt flamers did a bit of damamge exchange with the snow troopers. His unit had so many activations I was soon fighting an uphill battle and when tme was up we had just finished turn 4 and he had outscored me 2-1 to make it an 3-3 tie. But because he had wiped out far more unit points than I did he deservedly won the game.


I met some great people and had a lot of fun but maybe I shouldn't try out a new list/units that I have never played with before. I ended up with 6th place which isn't bad as I only won one game but the games I lost were against the 1st and 2nd placed players.  

I took home some prices, thoughts for the next event but most of all a lot of nice memories. and of course a new unit to paint up.


About the tournament


This tournament was organised by the fantastic guys of the Alliance Open. They really know how to put together a great event. Their enthusiasm is inspiring. Because it was a Star Wars day Event there were more than 40 x-Wing players, about 10 Armada players and the 12 Legion players.

This was there second Legion tournament, that last one in january was quite small and a side tournament for their main 40K event. They want to help this game grow in the Netherlands and I'm sure they will. They were so enthusiastic about Legion they have already told me they will have another big event just after summer.


The event was at the Amsterdam Airport Hotel, a great venue. they have enough space to house these events. Easy and free parking and the best lunch you can get. The buffet is really great and that alone would be worth the money.


A really nice touch this time was the 501st Legion Dutch Garrison. A group of enthusiastic cosplayers who showed up at the tournament. You could get your picture taken with them and chat about them with our mutial interest ...Star Wars. pictures of them below.


Ofcourse now event can do without sponsors. some tables were kindly sponsored but as always the guys from Tabletop Kingdom were present with a lot of Star Wars gaming stuff. They did some price support and gave a discount on all the Star Wars products. I ended up buying a Landspeeder with a nice discount.


Random Legion tournament pictures


501st Legion Dutch Garrison


And to prove there was an actual X-wing and Armada tournament as well...


Recap

As you have probably guessed I had a terrific time. My games were pretty bad but I had a good time so I'm still a winner. I took home a Best Painted Army award so that's still someting. Actually the painting award is pretty special to me. There were some very well painted armies there.
I'm already looking forward to the next Legion tournament and hope to see something posted by the Aliance Open soon about upcoming plans. 

I would like to thank my opponents for some great games, The other players for such a great Legion atmosphere and of course the Dennie, Martijn & Cees Jan  from Alliance Open for making this possible and last but certainly not least Mattijs Pels (a.k.a. Mattish) from Tabletop kingdom for organising this day.

Untill next time...

maandag 22 april 2019

My Legion Terrain (table 1)

I want to show you one of my legion tables. Everything you see is collected and painted by me. I also have a Tatooine table but this is my other set up. Most of the scenery you see here is by Micro Art Studio so if you like it have a look on their site(no official sponsor of this blog).
Click to enlarge
I don't exactly know what I have created but I really like this theme. I think this is a Liquid Kyber crystal refinery where Kyber crystals are processed to liquid form to fuel a Death Star. I know this isn't exactly canon but I think I can get away with it. If you have another suggestion please tell me.

I wanted to add more imerial signs. I have ordered some imperial decals from Company B but they were very dissapointing so I'm looking for others...

Here are all the pictures:

The long war view

Liquid Kyber Silo's
Kyber Crystals before processing

The Kyber Plant with small Basin
The Refinery's Defence centre

Large Kyber Basin

One of the Refinery's massive air vents

One of the Barracks that are used for housing workers and storage
The Refinery's Cargo Bay 
No Droids
 If you have any suggestions what planet this could be please let me know.


dinsdag 5 maart 2019

Tabletop Kingdom Campaign day

I went to the Star Wars Legion Campaign day organised by the Tabletop Kingdom in The Hague this sunday. We played three games of 2 hours and 15 minutes each. The outcome of the games had an effect on the following game and the missions and deployments had already been chosen for us.
We quickly got things going at 10;00 in the morning. I usually have a good start on tournament days but playing multiple games on one day is quite hard for me and I normally lose the second game and get exhausted by the third game. I wonder how people at LVO manage to play 5 games in a single day...

Game 1
bye bye Boba
My first game was against a new player who hadn't played many games yet but he was really good with the rules and even knew all the specifics of my rebel cards even if he only played imperial himself.  The first turn is always the longest but we soon got things going. The mission was "intercept the transmission" and deployment was "battle lines". Pretty straight forward game, my deployment was good and I had a plan. I lost some units by the end of turn one but I realized I was in a better position to claim the objectives at the end of turn two. My opponent was eager to kill off the units that had lost a few men/wounds which meant my other units could claim the objectives. My opponent realized this too late and I managed to claim all of the objectives and by doing so won the game. Time ran out before he could recover and we didn't get to the end of round 4. I had planned to take and hold the left and center objective but I could also get the third. My opponent overplayed Boba Fett, by that I mean he raced him forward where he then had to face my sniper team, Rebel troopers & fleet troopers. Boba is a strong unit but not if he is unsupported. He should be in and out and attacking cripled units. In this game my Wookies did pretty good but not great and Leia's bombardment took out a sniper unit before it could do anything.
Game 2
The second game was against Frank, a player who I had played against before. I had beaten him at the alliance tournament a couple of weeks ago but I had been lucky then. Frank is a good player and fun to play against, He also has a very nicely painted Imperial army.
We played "recover the supplies" with a "major offensive" deployment. We both placed our objectives near our deployment zones and the center objective was on top of a roof af a building in the middle of the table. I planned for Luke Skywalker to race up using a free range 1 move followed by a double move using Luke's "jump 1" abillity. Using Leia's "No time for sorrows" command card. This put Luke right next to the middle objective where he would have to weather the storm. Quick in and out was the plan before my opponent realised I had taken it away. Frank focused his fire on Luke but he survived the turn with
two wounds left. At the start of turn two I quickly pulled Luke and the objective back out of sight. Frank had claimed his own two objectives and there was no way I could make him drop either so I tried to hold on to the 3 objectives I claimed. Frank managed to kill my unit of fleet troopers that held the objective in the ruin in the bottom center and he raced forward to it which led to a massive hand to hand brawl between his Royal guard and a unit of rebel troopers who were quickly aided by my Wookies and even princess Leia, all in close combat. He had many other units moving in. Three groups of storm troopers supported by a unit of snow troopers and Veers slightly held off. I think his plan was to withdraw from the fight and then shoot my units to pieces and then collect the objective and the win but things went the other way. The Imperial guards were defeated by my rebel troopers. My wookies then quickly claimed the objective and the in
their second action carged the unit of snow troopers which moved in too close. They had already activated so He couldn't pull them back out of combat. I think Frank didn't see this coming but he then pured in with all the units which could and the all charged the wookies. They fought with Boba, a unit of storm troopers and the snow troopers. Only the wookie leader survived but he held on to the objective. Frank would have killed him if the time hadn't ran out. It was a very dirty victory. On one hand I felt quite good that I snatched victory from the jaws of certain defeat. I played the objective and saw an oppportunity, by charging the snow troopers he couldn't shoot me. On the other hand I felt as if I cheated my opponent out of a victory. I'm sure he thought as well he could have won this game but time was called by the judge standing next to our table.
I was now up 2-0 and only one game to go.
Game 3
The third game was on the same table as my first game but the terrain had been moved around. We played "sabotage the moisture vaporators" with "disarray" deployment. I had to sabotage the vaporators and my opponent had to repair them.

I had the advantage over my opponent because I had 9 activations and he only had 6. His units had a lot of upgrades on them but in my opinion it's boys over toys so because I had more units and models on the table I had the advantage. My opponent decided to deploy in just one of his two deployment zones and I spread out my units over both zones. This meant I could attack his army from two angles and from the first turn it was clear I wasn't going to lose. I don't mean to sound big headed or arrogant but it was pretty clear I would have an easy game. He had first turn and made the same mistake as my opponent from the first game where Boba raced forward on his own. I moved in with Luke and the wookies and took out Boba in the first turn. Leia's bombardement and my sniper took out a couple of his troops but more important made his units surpressed. Turn two I encircled his units in his deployment zone and peppered him with blaster fire. My opponent conceded by the end of turn two when he realised he wouldn't be able to break out of his deployment zone area. This game wasn't that exciting or challeging but I did get to practise some unit combinations and tricks.

My last win secured my 3-0 win of the day and gave me first place. I won some new alternative art cards and acrylic tokens and best of all I won a ticket for the Alliance "May Fourth" tournament. Looking very much forward to that.

Tabletop Kingdom has a good stock of Star Wars Legion products so I picked up Jyn Erso, a box of Pathfinders and Rebel Specialists. It's a fantastic store with a lot of games being played on a rainy sunday afternoon. If you ever visit The Hague make sure to stop by if you love games. Thank you TTK and Mattijs for hosting this event, it was a pleasure like always and well worth the 1,5 hours drive.
Tabletop Kingdom game store in The Hague

zaterdag 23 februari 2019

Battle-worn painting tutorial (Barricades)

I've been asked a few times how I paint the battle damage and rust effects on my Barricades. Because I had a second core set I had to paint up more barricades and made a tutorial out of it. The techniques are really simple and anyone can pull this off if you know the trick.
Below I will take you through each step.


I used an airbrush to prime the model, give it some pre-shading and then put a thin base layer over it. If you don't have an airbrush just paint the whole model grey. The reason I use an airbrush on larger flat surfaces like that is that I can pre-shade and that gives more depth to the model. The effect is very subtle so you don't have to do this step.

You can see the barricade on the left after I have painted the base layer over it. Here you can see the result of the pre-shading. a subtle effect. The barricade on the right is where we apply the next step. I dry-brushed the whole model with an ivory color paint. This adds an edge highlight to the piece.

To create more depth and contrast to the barricades I got out my number two favourite paint or actually wash (agrax eartshade is my number 1 if you were wondering). Get a small brush and let the wash run araound all the edges of the model. Make sure not use too much wash because it will pool. You can make a few oil leak streaks on the model coming from the grill bits using the wash. 
To add battle damage or worn look to the barricades you get a dark brown color, I used Black Brown and you get a piece of fine sponge. Get some paint on the sponge and dab it on a piece of kitchen towel first then dap it on a few place on the barricade. As you can see in the picture above you can achieve this look in just a couple of seconds. If you want to do this with a brush it would take you much longer and would be a lot harder to achieve. If you want to add extra detail you should get a small brush and some light grey/white paint and paint a few lines right underneath some of the pathes. This gives the impression of the paint chipping off. I didn't do this on my barricades however.

So far so good and most painters use the sponge trick so nothing new there but very few painters use oil paints as we always use acrylic paints but for the next step you should get some oil paints. Get a color that looks like rust (or maybe two) and put a few tiny dots on the model that you want to be the top of your rust streak. You can see it in the picture above but you'll have to look hard.

Because oil paints dry really slow you don't have to rush. You should also get some odourless white spirit that you can get in any hobby/craft store. Wet a large flat brush with some white spirit and and run it from top to bottom over the small dots of oil paint in the direction that you want your streak. You will instantly see the streaking effect. Because the oil paint doesn't dry quickly you can really work it. Pushing it around and if you make a mistake you can just whipe it off and start over. It's really easy and gives a great result. If you have done this on one of you models you will probably want to experiment with other colors to make other effects. (white oil paint for water streaks and black for oil stains for example). Even if you don't like the results the next day you can take a swab with some white spirit and remove it with a few rubs. Oil paints will just be another tool in your toolbox.

As a final step I have taken some metal color paint to add to the areas that we used the sponge technique on. It will make it look like fresh scratches. You can see it in the picture above but you'll have to look closely, I didn't want to over do this effect.

Now your battle worn barricades are ready. The barricades have a computer panel and some flashy lights on the back that you can paint but I'll leave that to you. On the left a bit of inspiration from my barricades.

vrijdag 22 februari 2019

Emperor Palpatine painted

Emperor Palpatine painted
CLICK TO ENLARGE
This miniature marks a new era for my Legion gaming. I have been painting rebels till this point and it only seemed fitting to me to start my Empire army with the big boss himself. I started the Rebel army with Luke Skywalker.
In the movies you can witness his transformation from the much loved senator from Naboo (sheev Palpatine) to the dark lord of the Sith (Darth Sidious) during the first three episodes. On the painting desk it took less then 3 hours start to finish.
Although painting this miniature meant using a lot of black and grey shades it was still fun and pretty quick. (I know the emperor should have a black cane but I wanted to make it look like wood)

UNLIMITED POWER!!!!
The only place you can really add some detail is in his face so I tried my best on that. I mixed in grey with skintone paints and then washed it with agrax eathshade, repainted the raised areas and washed the eye sockets with reikland flesh. then just worked my way up using lighter paints with each coat.

I'm looking forward to field him in games together with the imperial royal guard.

donderdag 14 februari 2019

DIY Cargo scatter terrain

Let's make some terrain pieces, Cheap and quick guide.
(click to enlarge)
In this tutorial I'll show you how to make your own Space Cargo scatter terrain but you can really do this for any wargaming scene you like. Since this is a Star Wars Legion Blog it wil be Space Cargo and will be mixed with my other space cargo. It will look good on the Tatooine markets or Space ports. Let's get started.

One of my favourite things in this hobby is making things myself. I ussually get an idea and then simply have to make it. I want to make my Tatooine buildings look a bit better by adding some tent cloth here and there. I haven't done that yet because I also had another idea for  using paper napkins and lots of glue.

These pieces can be created in just a couple of hours and it isn't a lot of work. You can really easily do this as a side project because you work on it for a bit and then have to wait a lot for the glue, paint and washes to dry. This is a project you can leave to dry and then come back to it again.

This is what you'll need:
-Foam
-PVA Glue
-Thin cardboard (I used a pizza box)
-String/cord/wire
-Paper towel/napkins
-Bitz to make it more interesting(optional)
-Knife
-Scissors
-Brushes
-Primer
-Paint
-Washes
-A SWLegion miniature (to check heights and measurements)

So as you can see these items will hardly cost you anything. You'll probably don't even have to go out to buy anything as most wargamers have plenty of this stuff.
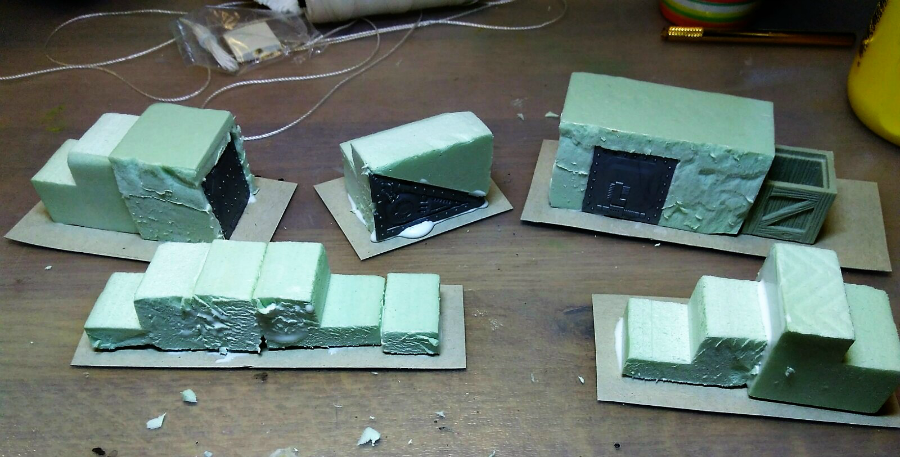
Basic shapes for the cargo pieces done
First you start by cutting the foam in basic shapes like you can see in the picture above. I glued them to a piece of cardboard from a pizza box. The cardboard will be the base of your piece. just make sure that the piece of cardboard is large enough to fit the foam and some space around it that we will use for draping the cloth over. It's handy to have a legion model at hand to check the seize and heights of the pieces your making. you'll want some to hide your models behind completely and some that they can shoot over from behind.
in the picture above you can also see that I added some spare bitz. I used some pegasus hobby components and some wooden crates that I still had. These will make the pieces look more interesting but aren't necessary.
Once your basic shapes are ready you can start with the glue. I mixed my PVA glue with water so it will be easier to use. Put glue all over the piece where you want to add cloth and then drape a paper towel/napkin over it. You then cover the whole paper towel with more watered down glue. Make sure you get all the creases and folds just the way you like.
Then take a piece of string and put that around your piece so it will look like a rope securing the cloth over the cargo.
Once this is done you can leave it to dry. after a couple of hours your piece should be dry and you add another layer of watered down PVA glue over the whole piece including the ropes, leave to dry and later add a third coat of glue. This might seem a bit overkill to you but what it will do is make your fragile piece rocksolid and firm. It will feel like a piece of plastic.
As you can see in the picture above I added some more wooden crates (1). These will look really good on your pieces. As you can also see there is still some of the pegasus hobby panels visible from under the cloth. not necessay but will all add to the piece.
When you look at the lower bit of the picture (2) you can see I trimmed the cardboard base to an organic shape, just as the cloth is draped on the ground. Your piece is now ready for painting.
looks a bit shiny and white because of bad lighting
The PVA coat makes the piece very shiny and smooth so I advise you to use a primer before you paint it. I used Vallejo primer and then painted everything in it's base colors. When dry I washed the whole piece with watered down Agrax Earth wash. Then I did a heavy drybrush with the same base colors and then a light drybrush with a 50/50 mix of the base color and white. you can now pick out a few details if you like but the piece is done and can be used on the table.

Here are some pictures of my pieces used in Legion games:
Space Cargo....any smugglers dream!

Star Wars Legion Cargo terrain

Star Wars Legion Cargo terrain